| | DR Z400SM IMS Tank Install |  |
|
+5Backwoods Boogie YamWOW! Focker Hodakaguy Relaytech 9 posters |
| Author | Message |
|---|
Relaytech

Posts : 271
Join date : 2009-01-06
Age : 63
 |  Subject: DR Z400SM IMS Tank Install Subject: DR Z400SM IMS Tank Install  1/24/2009, 9:44 pm 1/24/2009, 9:44 pm | |
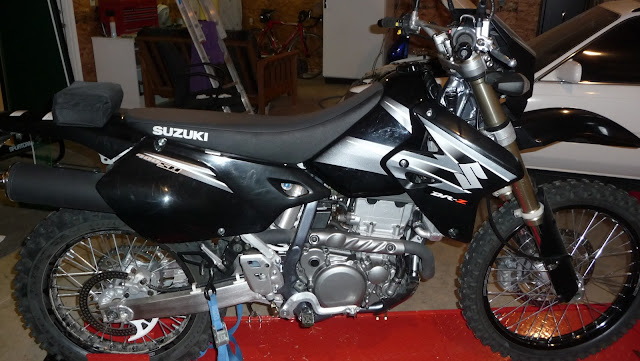
| OK, this is my first ever how-to/mod write-up, so if you have any pointers on improvement, go ahead and let me know. Here is what I started with:  The first order of business was to strip off the side panels, seat and tank.  I then removed the stock petcock from the original tank.  The new tank's mounting surface for the petcock is rather rough, so I did not think the stock O-ring on the petcock would be enough to seal off any gas leaks.  I found that the petcock pick-up/vent tube would not fit in the factory holes, so I opened them up to one oval hole.  To hopefully guard against any fuel leaks, I applied a thin layer of MotoSeal to the fuel tank's petcock mounting surface. Basically just enough to fill in the scratches from machining. This Motoseal is supposed to be fuel resistant. We shall see!  After mounting the petcock, I then attached the rear IMS mounting brackets to the tank. The instructions say to put the frame end of the brackets higher than the tank end. The frame end of the brackets have the larger hole to accommodate the factory rubber bushings.  I am not real happy with the build quality of this tank. I hear some people have no problem what so ever mounting these tanks, and other people have a real hard time with installation. I don't think their quality is consistent. Here is a pic of one of the minor flaws. The 2 threaded inserts are not even.  Now comes the hard part. Once I got the tank on the bike and loosely installed the bolts in the rear brackets to the frame, I then moved to the front of the bike to install the bolts through the shroud area of the tank to the radiators. No problem on the right side of the bike. But then when I moved to the left side of the bike, the hole in the shroud area of the tank was a 1/2 inch of from the hole in the radiator. I could not move things enough to get it to line up. So I went on ThumperTalk to se if I could find any info on this. apparently other people had this problem also. Most peoples remedy was to force the tank forward as much as possible, loosen up the radiator to frame mounts, then push the radiator towards the rear of the bike and install the through bolt once the two holes are lined up. Tighten the through bolt to the radiator and then tighten the radiator to frame bolts. Then tighten the rear tank bolts. All right, now we're cookin'!  Well, not so fast there! After getting everything tightened up, I started looking around the tank for clearances. Well now, the radiator fan motor is pressed up against the valve cover! :bang: I was not comfortable with things being stressed any how. So now what to do? I had an idea! I had some 1" wide, 1/8" ? thick flat aluminum stock in the shop, so I cut off a piece and bent it in half over a screw driver shaft. When bent in half, it was the same thickness as the IMS spacer. I then drilled holes on opposite sides of the aluminim, 1/2" apart. Then I bolted the adapter to the radiator, and the tank to the adapter. This might not make sense, but the picture should help. There is also a piece of rubber between the adapter and the tank. I think this worked out pretty well, But I don't think I should have to do something like this on a product that I spent good money on! Any how, the tank is now mounted with no stress.  After getting the tank installed, I then proceeded to put the seat back on. Well, now another problem. I can't get the seat on! :bang: I fought, and fought and fought, and then went back to ThumperTalk again. Another search, another remedy! LUBE! Some said to use WD40 on all contact points. Well that sounded good, but I thought it might become a mess once dirt got mixed with that stuff! Well I just happen to have some dry lube. It is Dupont Performance Dry Multi-Use Lubricant. This stuff did the trick! Just put the plastic back, install the fuel and vacuume lines, and presto!  | |
|
  | |
Hodakaguy
Admin

Posts : 1211
Join date : 2009-01-01
Bike : 13 KTM 500EXC - Orange Baby!
 |  Subject: Re: DR Z400SM IMS Tank Install Subject: Re: DR Z400SM IMS Tank Install  1/24/2009, 9:51 pm 1/24/2009, 9:51 pm | |
| Looks great  . Nice write up. That sucks on the quality control. Sure does look sweet in all black. Thanks for the post. Now we need some good weather so we can ride  Hodakaguy | |
|
  | |
Focker

Posts : 86
Join date : 2009-01-03
 |  Subject: Re: DR Z400SM IMS Tank Install Subject: Re: DR Z400SM IMS Tank Install  1/25/2009, 12:07 am 1/25/2009, 12:07 am | |
| - Relaytech wrote:
- OK, this is my first ever how-to/mod write-up, so if you have any pointers on improvement, go ahead and let me know.
You done good! :evil: | |
|
  | |
YamWOW!
Moderator

Posts : 591
Join date : 2009-01-01
Age : 54
Bike : 08' KTM 530 EXC-R, BMW F800GS
 |  Subject: Re: DR Z400SM IMS Tank Install Subject: Re: DR Z400SM IMS Tank Install  1/25/2009, 8:01 am 1/25/2009, 8:01 am | |
| Maybe the tank was right and your bike was crooked.  | |
|
  | |
Focker

Posts : 86
Join date : 2009-01-03
 |  Subject: Re: DR Z400SM IMS Tank Install Subject: Re: DR Z400SM IMS Tank Install  1/25/2009, 8:03 am 1/25/2009, 8:03 am | |
| - YamWOW! wrote:
- Maybe the tank was right and your bike was crooked.
 I wouldn't give him any crap...Remember he's packing your tuna can. | |
|
  | |
YamWOW!
Moderator

Posts : 591
Join date : 2009-01-01
Age : 54
Bike : 08' KTM 530 EXC-R, BMW F800GS
 |  Subject: Re: DR Z400SM IMS Tank Install Subject: Re: DR Z400SM IMS Tank Install  1/25/2009, 8:08 am 1/25/2009, 8:08 am | |
| | |
|
  | |
Relaytech

Posts : 271
Join date : 2009-01-06
Age : 63
 |  Subject: Re: DR Z400SM IMS Tank Install Subject: Re: DR Z400SM IMS Tank Install  1/25/2009, 3:28 pm 1/25/2009, 3:28 pm | |
| I don't know how the bike could be crooked, the stock parts fit perfectly! After all, "It's made in Japan. You know the Japanese make good stuff"!  | |
|
  | |
Backwoods Boogie
Moderator

Posts : 504
Join date : 2009-01-04
Age : 55
Bike : XR650R - Concours 14
 |  Subject: Re: DR Z400SM IMS Tank Install Subject: Re: DR Z400SM IMS Tank Install  1/25/2009, 5:13 pm 1/25/2009, 5:13 pm | |
| Nice job on the install...  I'm really liking the "blacked out" stealth look. Very cool  | |
|
  | |
Relaytech

Posts : 271
Join date : 2009-01-06
Age : 63
 |  Subject: Re: DR Z400SM IMS Tank Install Subject: Re: DR Z400SM IMS Tank Install  1/25/2009, 5:50 pm 1/25/2009, 5:50 pm | |
| Thanks for the compliments every one!  | |
|
  | |
Buck Nasty

Posts : 84
Join date : 2009-01-04
Age : 46
Bike : '04 DRZ400, '00 CR250R
 |  Subject: Re: DR Z400SM IMS Tank Install Subject: Re: DR Z400SM IMS Tank Install  1/25/2009, 11:47 pm 1/25/2009, 11:47 pm | |
| Nice! It needs more black though!  | |
|
  | |
Drewski

Posts : 11
Join date : 2010-05-21
Bike : DRZ 400 Suzuki
 |  Subject: Re: DR Z400SM IMS Tank Install Subject: Re: DR Z400SM IMS Tank Install  5/22/2010, 9:44 am 5/22/2010, 9:44 am | |
| Nice job on the new tank. Hows that SM suspension feel on the off road? | |
|
  | |
big jer

Posts : 539
Join date : 2009-08-13
Age : 56
Bike : XR650L , 990KTM
 | |
  | |
Relaytech

Posts : 271
Join date : 2009-01-06
Age : 63
 |  Subject: Re: DR Z400SM IMS Tank Install Subject: Re: DR Z400SM IMS Tank Install  5/22/2010, 3:42 pm 5/22/2010, 3:42 pm | |
| - Drewski wrote:
- Nice job on the new tank. Hows that SM suspension feel on the off road?
Not too bad, but not as good as my regular off-road only DR Z400. I am sure it could use some dialing in, but have never done it. | |
|
  | |
Relaytech

Posts : 271
Join date : 2009-01-06
Age : 63
 |  Subject: Re: DR Z400SM IMS Tank Install Subject: Re: DR Z400SM IMS Tank Install  5/22/2010, 3:47 pm 5/22/2010, 3:47 pm | |
| | |
|
  | |
mamacone

Posts : 117
Join date : 2009-01-04
 |  Subject: Re: DR Z400SM IMS Tank Install Subject: Re: DR Z400SM IMS Tank Install  5/22/2010, 7:12 pm 5/22/2010, 7:12 pm | |
| That stealth Z should have the giant loop on it by now, so it is ready for the Nevada dessert on Wed. | |
|
  | |
Relaytech

Posts : 271
Join date : 2009-01-06
Age : 63
 |  Subject: Re: DR Z400SM IMS Tank Install Subject: Re: DR Z400SM IMS Tank Install  5/25/2010, 7:05 pm 5/25/2010, 7:05 pm | |
| - mamacone wrote:
- That stealth Z should have the giant loop on it by now, so it is ready for the Nevada dessert on Wed.
Yeah, I know. Have to catch the next one.  | |
|
  | |
Sponsored content
 |  Subject: Re: DR Z400SM IMS Tank Install Subject: Re: DR Z400SM IMS Tank Install  | |
| |
|
  | |
| | DR Z400SM IMS Tank Install |  |
|
