| | VW Syncro Westfalia - Build Log with Pics |  |
|
+8n16ht5 Meberhar Relaytech Inspector mamacone DEisenhard Shane Hodakaguy 12 posters |
|
| Author | Message |
|---|
Hodakaguy
Admin

Posts : 1211
Join date : 2009-01-01
Bike : 13 KTM 500EXC - Orange Baby!
|  Subject: VW Syncro Westfalia - Build Log with Pics Subject: VW Syncro Westfalia - Build Log with Pics  8/15/2012, 4:12 am 8/15/2012, 4:12 am | |
| For years I've wanted a Syncro Westy and a few months ago I was lucky enough to pick up a clean low mile (47K) one owner 90 Syncro  My father and I split ownership on the Syncro and decided to build it up to be our camping vehicle. I'll add photo's of the process as I start modifying and doing maint on the Westy. We decided on a list of items that we wanted to add/change to fit our plans. Engine: I changed the fuel lines, fuel reg, plugs and wires and the stock engine runs like a champ...But. Looking for reliability and a little more HP for high elevation travel we decided to do a engine swap. After doing quite a bit of research we settled on the Subaru 2.5L. My wife drives a forester with this engine so I'm well familiar with it (rebuilt the heads etc a couple months ago). Conversion Kit: I decided to go with the Rocky Mountain Westy kit. I like the design of the engine mount, exhaust system, etc. Can't wait to start the installation process...more to follow soon. Other Items: Install a Propex heater, Upgrade the cooling lines, Upgrade suspension and shocks, install a SA Grill, Bumpers/Tire Carriers and other small misc items. Here's a couple pictures of the Westy in stock form. 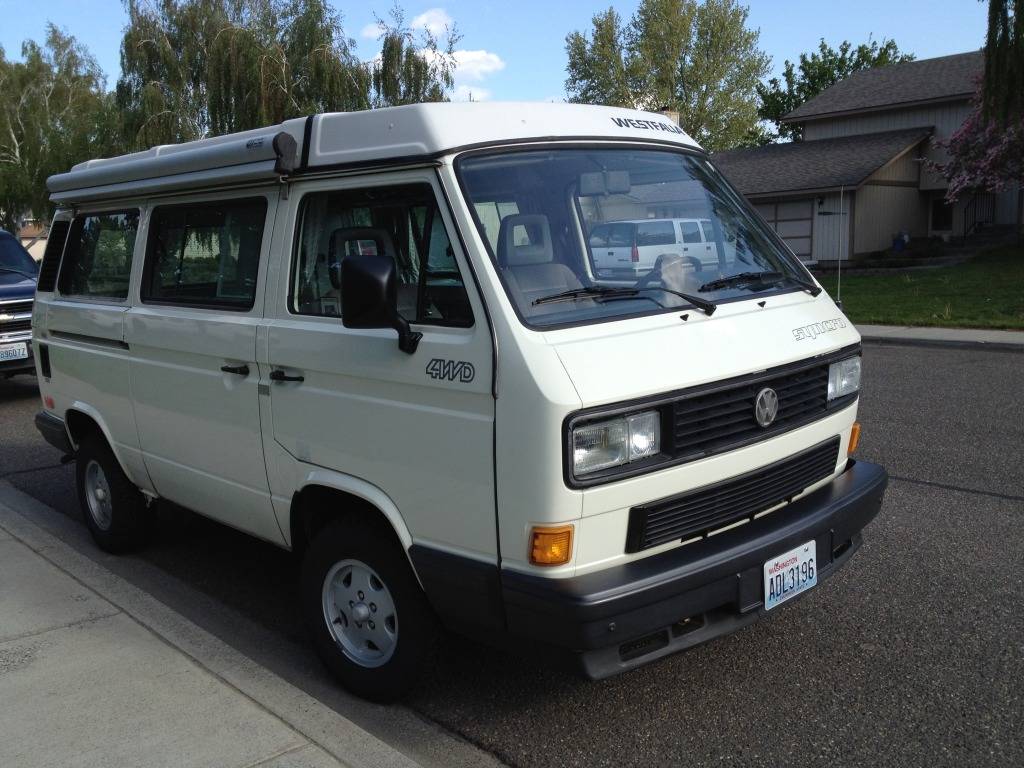     A couple weeks ago I picked up the first of the big parts, a 2006 Subaru 2.5L with all the needed parts. The engine has 60K miles on it, I will go ahead and install a new timing belt, water pump, idlers etc while the engine is on the stand. Yikes! 41lbs of wiring!!  More goodies arriving. Received the Fox Shocks and new 16" wheels/BFG's.   6-22-12 6-22-12 I'm suppose to be working on a couple house projects today...but I woke up early and was able to sneak in a little Syncro play :-) Decided to get the new tires installed to see what they looked like, I won't be driving it much till the engine/suspension gets installed so the larger tires shouldn't be a problem for now.  The original owner had the vehicle undercoated when they bought it, it really did a decent job in keeping corrosion at bay under the bus. It did spend quite a bit of time in Alaska on gravel roads so there is some rock chip damage along the bottom rocker panels, I'll be addressing that after we get all the upgrades installed.  Nice little lip forming on the rotor, looks like new rotors will be in the works. I'd like to do a big brake upgrade, might just re-build stock for now and do that down the road.  Not Bad...can't wait to see it with the new suspension bits installed!  Power Windows. I'm not a huge power window fan in older vehicles, when we purchased the Syncro the passenger side window wasn't working, although the drivers side was working great. Fast forward a month and both windows were inoperable. To make matters worse the AC is out of charge and I don't want to spend time fixing it till after the Subaru swap. Eventually I'm going to replace the power windows with manual units...now it's in the 90's and something needs to be done! I decided to remove the drivers side regulator and have a look at what's going on.  Door Panel removed.  Plastic removed. There are some good threads on regulator removal/repair on Samba...Thanks!  All the plastic parts look to be in excellent cond.  And here's the problem. The rivet broke that holds the black plastic guide on the bottom of the regulator. The plastic piece is in great shape...this might be a easy fix!   All good here.  And here's the problem. When the rivet broke it allowed the tension on the cable to relax...allowing the cable to turn itself into a rats nest! The cable is shot. All the plastic parts in the gear box seem to be in great shape.   I took the assy to a couple bike shops today to see if they could make another cable for it but they couldn't....after doing a little looking at some industrial supply shops I think I might be able to make up my own cable. All the cable that I found was slightly smaller than the OEM cable, and I couldn't find any cable ends/crimps that were small enough. I'll try and fabricate my own ends and solder them to the cables. More work tomorrow. Hodakaguy
Last edited by Hodakaguy on 8/15/2012, 4:27 am; edited 2 times in total | |
|
| | |
Hodakaguy
Admin
Posts : 1211
Join date : 2009-01-01
Bike : 13 KTM 500EXC - Orange Baby!
| | Subject: Re: VW Syncro Westfalia - Build Log with Pics 8/15/2012, 4:13 am | |
| Picked up a permanent fix to my power windows :-)  Installed the drivers side manual window regulator yesterday. Cleaned the regulators then packed them with Sil-Glyde and they are operating as smooth as butter :-). Regulator installed in the door  I was going to mark/cut the hole for the manual regulator but it looks like VW already did it for me :D . Just remove the tape on the back of the panel and instant hole.  Here's a picture showing the location of the manual regulator hole (located with finger) compared to the electric switch hole. I was going to cover the electric hole with a fold down cup holder...but they are pretty close and it looks like the window crank will hit the cup holder if I went that route. Going to have to scratch the head on this one for a bit and see what I come up with to cover the hole...want it to look professional and not a afterthought.  More to come...need to get back to driveway work  Hodakaguy | |
|
| | |
Hodakaguy
Admin
Posts : 1211
Join date : 2009-01-01
Bike : 13 KTM 500EXC - Orange Baby!
| | Subject: Re: VW Syncro Westfalia - Build Log with Pics 8/15/2012, 4:14 am | |
| Work around the house has slowed progress on the Westy.  I did manage to get a little work done on the 2.5L this weekend. Received my parts for the timing belt change out in the mail on friday, decided to do a little work on it early Sat morning. The engine only has 60K miles on it but since it's out of the vehicle and on the stand it makes since to freshen everything up while it's easy to get at. Timing belt removed.  New water pump installed.  New idlers, water pump, thermostat, timing belt and belt tensioner installed. Note the red arrow, this is where the timing belt guide would be if this engine came out of a manual transmission car. The guide keeps the belt from skipping a tooth if its parked in gear on a hill without the E-brake. Since this engine came out of an automatic Outback it doesn't have the guide, Since I will be installing it in a manual Vanagon I will install the guide before I button it up.  A shot of the guide as listed in the Subaru repair manual. The part is only $5.00 and I figured the Japanese installed it for a reason, I'll install it on mine for cheap insurance.  Old parts.  A few more bits showed up for the build. Received the front and rear wheel bearings, hardware and seals. Also received the Burley upper control arms and T3 Powerflex suspension bushings.    Once I start on the suspension I'll sand blast all the parts and powdercoat them while they are out, should make a clean install once re-assembled. Can't wait! Hodakaguy | |
|
| | |
Hodakaguy
Admin
Posts : 1211
Join date : 2009-01-01
Bike : 13 KTM 500EXC - Orange Baby!
| | Subject: Re: VW Syncro Westfalia - Build Log with Pics 8/15/2012, 4:14 am | |
| Ok...Finally go the new driveway poured so the Syncro build can resume. I will be pulling the stock engine soon, lots of work ahead. I've made a few small steps....hopefully the pace will pick up now. Tightening the crank pulley. You need clean oiled threads and it needs to rotate at least 60 deg before it gets full torque. Mine went past 90 deg and finally hit torque. Here's a shot tightening the crank pulley.  Installing the reverse coolant manifold. With the intake manifold removed you can see the stock coolant manifold. The modified manifold will exit the engine on the back side instead of the front...making for a nice clean install in the bus.  Here you can see the modifications done to the stock coolant manifold. This manifold is from RMW. There is deep corrosion pitting where the coolant hose connects to the manifold on the RMW supplied unit...the core I'm sending them is nice and clean :? . I will clean up the RMW unit and fill in the pits with metal filler, don't want any leaks at the hose connection.  Lots of parts :-)  Had a lighting storm pass over a couple days ago, I drove the Westy to a vacant lot and tried to frame the bus in with a lightning bolt...unfortunately the lightning stopped right as I got set up :-(  The engine coolant sensor harness needs to be modified to reach the new sensor location. The blue arrow is where the original sensor port was located...the red arrows are where the harness needs to reach now. Here I've started to lengthen the stock harness.  Harness modified :-)   Hopefully more progress will be made soon. Hodakaguy | |
|
| | |
Hodakaguy
Admin
Posts : 1211
Join date : 2009-01-01
Bike : 13 KTM 500EXC - Orange Baby!
| | Subject: Re: VW Syncro Westfalia - Build Log with Pics 8/15/2012, 4:15 am | |
| Ok...progress is being made...slow....but being made. Time to install the oil pan, sure is nice having the engine on a stand!  Pan is off. Here's a shot of the OEM unit next to the RMW shortened pan.  A shot of the shortened oil pick up next to the OEM unit.   Here's a close up of the pick up tubes. Notice the stock unit has three points that stick up around the pick up area, if the pan gets dented/flattened these will make sure that there is still sufficient room for oil to make it to the pickup.  The RMW pan is very high quality and has a thick bottom on it, it would be hard to dent it hard enough to close off the oil pick up.....but I thought I would add a little extra insurance just in case. Here I just TIG welded a couple stainless steel rods to the bottom of the pickup. If the pan gets smashed in it should keep a sufficient gap between the pickup and pan...assuring a healthy oil supply to the engine. :-)   Shortened pick up tube and new O-ring installed.  At this point I ran into a little problem. The shortened pan wouldn't fit. The baffle that is welded into the pan is interfering with the baffle that is bolted inside the engine, keeping the oil pan from sitting all the way down onto the block. A email and call to RMW verified that the 06 pan can't be shortened so they supply 04 down pans, I will need to trim the engine side baffle a little to get the clearance needed to install the pan on 06 engine. Should be a easy fix. On a side note the oil return tube is missing from the shortened pan, RMW said they haven't had any issues with this setup and I'm sure it will be fine but my OCD is kicking in so I will contact RMW about it and see if they have a unit with the tube still in place. I might end up welding in the return tube from the OEM pan if a replacement isn't available. A shot of the contact points with the shortened pan and 06 engine.   With the oil pan install delayed a bit I turned my attention to re-installing the intake system. Looking like a engine again :-). I will leave the AC Compressor and Alternator off the engine until I verify the shortened pan will work, just in case I need to install the OEM dipstick again.  Now it's time to remove the stock engine so I can start prep for the Subaru installation. Here Mike is disconnecting the shift linkage before we drop the engine.  Engine ready to lower.  Separated from the trans.  Almost out!  Out!    Now to remove the wiring harness, trim the firewall, drop the tank and clean it.....lots more to come!  Hodakaguy | |
|
| | |
Hodakaguy
Admin
Posts : 1211
Join date : 2009-01-01
Bike : 13 KTM 500EXC - Orange Baby!
| | Subject: Re: VW Syncro Westfalia - Build Log with Pics 8/15/2012, 4:15 am | |
| A little progress after work tonight. Removed the wiring harness and ECU.  Starting to get quite a pile of parts in the garage.  Decided to modify the engine baffle plate to get the shortened pan to bolt up correctly. The baffle in the 06 engines needs to be trimmed along the red line to clear the baffle in the earlier oil pan.  Here the baffle has been trimmed to fit.   The sections removed from the baffle.   And a picture of the oil pan so you can see why it need to be trimmed.  The extra clearance and stronger pan will be a great benefit.   I still need to verify proper clearance on the oil pick up and seal/bolt down the pan. Lots more to go! Hodakaguy | |
|
| | |
Hodakaguy
Admin
Posts : 1211
Join date : 2009-01-01
Bike : 13 KTM 500EXC - Orange Baby!
| | Subject: Re: VW Syncro Westfalia - Build Log with Pics 8/15/2012, 4:16 am | |
| Minor work done today. Trans removed :-)    Now that it's out of the bus I can clean it up, free the stuck diff lock actuator, clean lube the cross shaft, remove the starter and modify the diff actuator bracket to take the TDI starter. Down to the car wash to clean the trans....but first a quick stop at Mikes to install the engine in his 67.  A couple cans of Gunk and we hang around for a bit and wait for it to do its magic.  Before...  And after.....There is still undercoating on the trans but it looks a lot better. I've give it some hand cleaning at home.   Next up to remove the coolant lines/hoses and remove the fuel tank. Hodakaguy | |
|
| | |
Hodakaguy
Admin
Posts : 1211
Join date : 2009-01-01
Bike : 13 KTM 500EXC - Orange Baby!
| | Subject: Re: VW Syncro Westfalia - Build Log with Pics 8/15/2012, 4:16 am | |
| Little more progress today. Ready to get started. Going to remove the cooling lines first, then the fuel tank. Nice clean cardboard to start with :-)  Removing the snap ties and two hose clamps that hold the plastic engine coolant lines and heater core lines in place.  Coolant lines removed from the bus.  The plastic lines are actually in great cond, the undercoating has protected them well and they are even still white in color under the coating. I will be replacing these with Stainless Steel lines when re-assembly starts.  Coolant lines out of the way.  With the coolant lines removed I can trim the firewall to accommodate the Subaru coolant lines. The firewall needs to be trimmed along the black line.  Quick work with the cut off wheel. The edge will be painted and finished off with a piece of molding.   Fuel tank straps and stub axle removed.  The straps are in pretty decent shape. I will sand blast and powder coat them before re-assembly.  Draining the fuel tank...I had ran it down pretty good before parking it and had only 3 gallons or so to drain. I used a piece of hose to drain it into the pan, wanted direct contact (bonding) with the hose and the pan so no static electricity would be developed.  I will remove the suspension on each side to install new bearings, seals, springs, shocks and powder coat all components before re-assembly. As long as the engine and trans are out of the bus now seems like a good time to do the work since I can easily work on the back side of the suspension. It's getting hot out today (close to 100 deg) so I'll stop outside work at this point today. Bus on jack stands and tire removed.  Time to get a little inside work done. Cleaned on the trans a little and removed the cross shaft. I will replace the input seal before re-installing the trans.  Cross shaft is in good cond, the plastic bushing has a crack in it so I will try and locate one before re-assembly.   Started work on the diff lock actuator. The shaft is free and the actuator is functioning fine. I will clean/lube everything up and before installing the trans.  We'll I'm done for the day. More progress soon. Hodakaguy | |
|
| | |
Hodakaguy
Admin
Posts : 1211
Join date : 2009-01-01
Bike : 13 KTM 500EXC - Orange Baby!
| | Subject: Re: VW Syncro Westfalia - Build Log with Pics 8/15/2012, 4:19 am | |
| Time to clean up a few parts. I friend of mine has a powder coating oven/setup that works great so I borrowed it for this built. I'll be powdercoating all the small pieces, brackets etc before re-installing them on the bus. Here's a link to our last powder coating adventure on my friends BMW GS motorcycle...It was a fun project that kept growing in scope as we went...came out very nice. Link Here: http://www.advrider.com/forums/showthread.php?t=286318&highlight=hodakaguyWith the help of mike we brought the PC oven to my house. Not Light!  Woke up early this am and ran into work to sand blast the parts. Minor pitting from surface rust but the parts are in really good cond. All cleaned up and ready for powder coating.  One of the spot welds had come loose on the tab that holds the fuel pump in place. With the parts cleaned up now is the time to fix it. Picture of my ugly mug getting ready to re-weld the fuel pump mount.  Welded and ready to be powder coated.   Prepping the cross shaft arm for PC. The tape is a special high temp tape that you can use in the oven. I left the tip of the ball clear of PC and will lubricate well during install.  Parts baking in the oven...385 deg F. for 19 min. We use Columbia Powdercoating powder and really like their MiniTex black. It's a fine textured satin black that is UV stable and holds up very well to scratches etc. I'll be doing all the parts in MiniTex.  Pull the parts out of the oven...let them cool down and they are ready to bolt up. No waiting for paint to dry! Here's the parts fresh out of the oven, ready for years more of service.   There will be lots more powder coating to come....Soooooooo much to do! Hodakaguy | |
|
| | |
Hodakaguy
Admin
Posts : 1211
Join date : 2009-01-01
Bike : 13 KTM 500EXC - Orange Baby!
| | Subject: Re: VW Syncro Westfalia - Build Log with Pics 8/15/2012, 4:19 am | |
| Thanks. Here's the latest progress report. Started on the suspension today. I want to get the suspension finished and back on the bus before dropping the fuel tank, I just don't like being under the bus while it's up on jack stands. Well here goes....  And the right rear is off :D   With temps in the 90's the operation is moved into the shade beneath the tree. All parts are placed in labeled zip lock baggies, makes it easy to keep track of parts.  Bearings have a little bit of play and a rough sound to them...new bearings/seals will be installed.  All taken apart. Now time to get the bushings out. A vise, a socket and a piece of tubing worked great to remove the bushings.  Now to get the sand blasting out of the way....ugggg  Parts sand blasted and ready for powder coating. No energy or time left today....start again in the am. :D  Hodakaguy | |
|
| | |
Hodakaguy
Admin
Posts : 1211
Join date : 2009-01-01
Bike : 13 KTM 500EXC - Orange Baby!
| | Subject: Re: VW Syncro Westfalia - Build Log with Pics 8/15/2012, 4:20 am | |
| Progress report. Woke up this morning and started masking parts in preparation for powder coating. This is a high temp tape made to be used in the oven. I masked off the phono finish area where the hub and drum mate up, don't want PC causing the connection to get loose down the road as the PC wears.  More masking.    Applying powder.    19 minutes in the oven and out back to cool down.  Last piece for the day. Since it's heavy and would be easy to mess up while removing it from the oven I shut the oven down and let it cool in place.  A group of freshly PC'd parts. Since the drum takes the brunt of the heat I painted it with 1200 Deg F. Stove Paint instead of PC.  After powder coating I applied rubberized undercoating to add an extra layer of protection inside the rear control arm, with a extra thick layer along the seams.  Over at Mike's polishing up the seal surface on the axle.  Inboard bearing installed. This bearing slips in easily and is secured by a large snap ring. (Snap ring not installed yet in pic). It will be well greased with Waterproof Bel-Ray grease.  For the outboard bearing I used Dry Ice and Denatured Alcohol to shrink the bearing down. Liquid N2 works best but this method will get you around -110 Deg F. Shrinking parts helps prevent wear and tear on both the new bearing and the housing during install. A properly cooled part will require a lot less force to seat the bearing then just pressing/driving a warm bearing.  Outboard bearing installed. Next up pack the bearing with grease and press in the axle. At this point I remembered I was going to drill and tap a hole for a grease zert...oh well bearings are already installed so I will have to do that down the road some time. More to come.  Hodakaguy | |
|
| | |
Hodakaguy
Admin
Posts : 1211
Join date : 2009-01-01
Bike : 13 KTM 500EXC - Orange Baby!
| | Subject: Re: VW Syncro Westfalia - Build Log with Pics 8/15/2012, 4:21 am | |
| Time to install the rear trailing arm bushings. I'm going to use T3 Technique Powerflex polyurethane suspension bushings on the entire bus. From everything that I've read they really help to improve the handling. Here's the copper 2" x 1.5" reducer bushing that I picked up at the hardware store to use as a installation tool. I'll use this with a piece of all thread and a few washers to install the bushings.  It took a few tries to get this down where it would work. To install the bushing start off with the all thread and washers to pull the well greased suspension bushing into the reducer bushing. Once the suspension bushing is in the throat of the reducer bushing you need to stop and tip the control arm up, resting on the copper bushing. You have to keep pressure on the copper bushing (Pressing it tight against the trailing arm) otherwise the suspension bushing will separate the copper bushing and trailing arm when it pops through the reducer. Once the suspension bushing is drawn into the trailing arm most of the way remove the washer and replace with a large socket (piece of pipe ect) so you can finish pulling the bushing through (The socket is needed so the edge of the suspension busing has room to poke through. Step One.  Step Two  Trailing arm back in place.  Use LOTS of grease on the bushings. I used Bel-Ray Waterproof grease and slathered them heavily.  Getting back together again.  I thought about power washing the entire underside and re-applying a fresh coating of undercoating.....but the undercoating that's on there is in pretty decent cond (dirty) and I have to draw the line somewhere so I can try to finish the project up before it gets to cold this winter. I'll spot detail certain areas etc instead. Lots more to come. Hodakaguy | |
|
| | |
Hodakaguy
Admin
Posts : 1211
Join date : 2009-01-01
Bike : 13 KTM 500EXC - Orange Baby!
| | Subject: Re: VW Syncro Westfalia - Build Log with Pics 8/20/2012, 8:40 pm | |
| Not a lot of progress on my Westy lately, Been working etc. Did manage to take a camping trip with family and friends last weekend, it sure would have been nice to have the westy along! Tonight's progress....well on Mikes bus anyways :-). Mike recently sold his H6 and he's going to install a 2.5L, tonight was the night to remove the H6 so it can be transported to it's new home. Almost ready to pull.  Using a shop vac to suck the coolant out of the system, just crack the bleed up front and you can suck most of the coolant out of the system....nice and clean.  Dropping the engine/trans down.  Disconnecting a few last minute wires/hoses.  Disconnecting the Link ECU  Raising the rear a little more to get clearance to slide the engine out.   Engine/Trans out   Hodakaguy | |
|
| | |
Hodakaguy
Admin
Posts : 1211
Join date : 2009-01-01
Bike : 13 KTM 500EXC - Orange Baby!
| | Subject: Re: VW Syncro Westfalia - Build Log with Pics 8/24/2012, 6:56 am | |
| Started tearing down the CV joints last night, I was tired and didn't feel like going out to the bus so thought I'd try and get something done in the garage before bed. First up was to fabricate a crude tool to remove the CV joints from the axle. This is just a notched piece of stainless scrap I had laying around, I welded on the angle to give it a little more strength.  Ready to pull  Was tired and in to big a hurry to put cardboard down :baldy. Cleaning for me today :cry  After cleaning up the CV joint I took it apart to have a look. Everything is indexed upon disassembly so all the balls will go back in the same race upon re-assembly. In this shot everything is laying out in the order it was assembled in. All the races looked really good, except one that has a couple flat spots in it that's large enough to catch with my finger. The ball for this race is also pitted and the finish is dull unlike the others. The red arrows are pointing to the worn race.  Worn ball  And worn flat spots   It might be fine once packed with fresh grease.....I think I will install new CV joints and start fresh though, I don't want to have to pull these apart again for a long time :deal Hodakaguy | |
|
| | |
Hodakaguy
Admin
Posts : 1211
Join date : 2009-01-01
Bike : 13 KTM 500EXC - Orange Baby!
| | Subject: Re: VW Syncro Westfalia - Build Log with Pics 8/24/2012, 8:15 pm | |
| Ok...probably not what I should be messing with right now.....but... I borrowed my friends vinyl graphics plotter today and started playing with a couple sticker ideas. Wasn't really in the crawl under the bus mood today  A picture of the plotter....you can cut soooo many cool things with this baby!  After cutting the sticker you have to "weed" it, or remove the sticker material that you don't need.    Once it's all weeded you apply the transfer tape, it's a tape that is sticky enough to lift the graphics off the paper...then once placed on the intended item the graphics are stickier than the transfer paper so you can peel the transfer paper off leaving the stickers behind.  Before....  After....  I have a few more ideas for later  Hodakaguy | |
|
| | |
Shane

Posts : 843
Join date : 2009-08-04
Age : 48
Bike : 09' DR650SE
| | Subject: Re: VW Syncro Westfalia - Build Log with Pics 8/24/2012, 8:23 pm | |
| Ok. I just foind this thread... This is right up my alley.. I have been a Subaru tech for 17 years. I need to get on a pc and read this hole thread. (Smart phones only do so much.) First thing I saw was you asking about the little bracket above the crank gear that keeps the belt from skipping a tooth. This was only found on a manuel trans car. So. If i didnt have one. It was out of a automatic trans car. If you have anyother questions that I can answere shoot me a pm. I hope you did head gaskets before you put the motor together. They like ro leak coolant under #4 cylinder. Wow this is cool.  | |
|
| | |
Hodakaguy
Admin
Posts : 1211
Join date : 2009-01-01
Bike : 13 KTM 500EXC - Orange Baby!
| | Subject: Re: VW Syncro Westfalia - Build Log with Pics 8/25/2012, 5:43 am | |
| - Shane wrote:
- Ok. I just foind this thread... This is right up my alley.. I have been a Subaru tech for 17 years. I need to get on a pc and read this hole thread. (Smart phones only do so much.) First thing I saw was you asking about the little bracket above the crank gear that keeps the belt from skipping a tooth. This was only found on a manuel trans car. So. If i didnt have one. It was out of a automatic trans car. If you have anyother questions that I can answere shoot me a pm. I hope you did head gaskets before you put the motor together. They like ro leak coolant under #4 cylinder. Wow this is cool.
Thanks for the heads up, I ordered the manual trans timing belt guide and installed it. I didn't do the heads yet, it has 60K on it so for now I'll just continue to add the Subie Sauce and hope for the best, we have a 2000 forester that I did the heads on this spring. it had 98K miles on it when it failed. Now that I know your a Subie Tech I may be picking your brain in the future  Hodakaguy | |
|
| | |
Shane
Posts : 843
Join date : 2009-08-04
Age : 48
Bike : 09' DR650SE
| | Subject: Re: VW Syncro Westfalia - Build Log with Pics 8/25/2012, 5:56 am | |
| Anytime. Those are great motors even if you have to do a H/G. If you are useing the additive to stop a leak, I would only use one bottle. That stuff has been known to plug radiators. It was a hail marry repair to try and stop a big warnty rpair bill on subarus side. It realy doesnt work to well. | |
|
| | |
Hodakaguy
Admin
Posts : 1211
Join date : 2009-01-01
Bike : 13 KTM 500EXC - Orange Baby!
| | Subject: Re: VW Syncro Westfalia - Build Log with Pics 8/26/2012, 4:44 pm | |
| - Shane wrote:
- Anytime. Those are great motors even if you have to do a H/G. If you are useing the additive to stop a leak, I would only use one bottle. That stuff has been known to plug radiators. It was a hail marry repair to try and stop a big warnty rpair bill on subarus side. It realy doesnt work to well.
I was using one bottle with a coolant change out every couple years. If I have to do head gaskets down the road there is plenty of space to access them well, hopefully I'll get some years out of it before they fail.  Hodakaguy | |
|
| | |
Hodakaguy
Admin
Posts : 1211
Join date : 2009-01-01
Bike : 13 KTM 500EXC - Orange Baby!
| | Subject: Re: VW Syncro Westfalia - Build Log with Pics 8/26/2012, 4:45 pm | |
| Progress report. This am I removed the other CV from the passenger side axle, since making the decision to install new CV joints removing it went faster....I wasn't concerned with keeping all the parts indexed. Next up...remove the drivers side axle assy. I couldn't find the 6mm Allen socket that I had used previously with my impact to remove the bolts, I did manage to find a 6mm Allen socket with a ball end on it though. I was leery to try it since it wouldn't have a lot of surface contact and might strip the bold head. Oh well...slap that baby on the impact we have progress to make! Pull the trigger and SNAP...now I have a Allen stuck in the bolt...Dohhhhh  . I knew better that to try that!  On to plan B....I will remove the brakes and push the stub axle out the back with the drive axle attached. First up..remove the cotter key holding the axle nut on. Easy you say? Well it's rusted in solid and won't budge. I pry around on it long enough to break off the ends then switch over to using a drift to punch it out. No dice, it's in solid. At this point I attach the nut removal tool and smack it hard a few times with a small sledge...it sheared the cotter pin flush and the nut was off. I'll worry about getting it out of the hole later. Dissembled the brakes and used a wooden block to knock the stub axle out the back side of the bearing housing. Now just pull the axle assy out....nope, won't clear the trailing arm with the CV still attached. On to plan C, Pull the trailing arm/axle as an assembly. That went smooth.  Looking pretty bare.  Snapped Allen.  Now that's the assy is off the bus it's time to get the axle out. Removed the 4 bolts on the bearing housing and pulled the axle assy out the front. Done!  A pair of Vise Grips and a hammer quickly removes the offending bolt.   Removed the bearings/seals from the housing, removed the CV joints from the shaft. One CV was nice and smooth the other was stiff...in the garbage they go. Now to get everything sand blasted and Powder Coated.  I'm also playing with the stickers still....trying to nail down what design I like best.   Hodakaguy | |
|
| | |
DEisenhard

Posts : 33
Join date : 2012-04-22
Bike : 2001 Honda XR650L
| | Subject: Re: VW Syncro Westfalia - Build Log with Pics 8/26/2012, 7:25 pm | |
| Hodakaguy,
Shane is the MAN on Subaru stuff. He has fixed or convinced us of so many preventative maintenance issues on our 1991 Subaru. I'm impressed you have the energy for all the stuff you do, too! | |
|
| | |
Hodakaguy
Admin
Posts : 1211
Join date : 2009-01-01
Bike : 13 KTM 500EXC - Orange Baby!
| | Subject: Re: VW Syncro Westfalia - Build Log with Pics 9/1/2012, 4:54 pm | |
| Got up early and Mike and I removed the fuel tank, it's a tight fit! Now that it's out I will re-seal it and install new fuel lines. The tank straps and original insulation are in great cond.  Fuel tank  Not much rust behind the fuel tank, small localized spots. They will be dealt with soon.  Parts ready to glass bead.  Cleaned up and ready to be Powder Coated.  Time for a little steam cleaning. Borrowed a steam cleaner and went to town.  This wand is great for cleaning under a vehicle, it adjusts on the fly to get hard to reach areas.   Steam cleaned the engine bay. The original undercoating looks like a tar based stuff and is on there like glue! I can get it off by going really slow with the want but I don't think it's neccesary to remove everything. It's done a great job of keeping the original metal/paint in great cond under it, every spot that I removed it completely looked like new underneath. I will prep it and re-apply undercoating to cover it all again. Once everything is back together I will apply Waxoyl over everything, living in the desert it will stay in great cond for a LONG time :-)  Time to clean up the trans....Before...  And after steam cleaning.  Lots more to go.. Hodakaguy | |
|
| | |
Shane
Posts : 843
Join date : 2009-08-04
Age : 48
Bike : 09' DR650SE
| | Subject: Re: VW Syncro Westfalia - Build Log with Pics 9/1/2012, 8:01 pm | |
| NICE WORK! I showed a couple guys your build at work....we are watching. ....
Question, why did your friend remove the H6. Those were and still are good motors. Gas milage kinda suffers but lots more power. Just woundeeing. | |
|
| | |
Hodakaguy
Admin
Posts : 1211
Join date : 2009-01-01
Bike : 13 KTM 500EXC - Orange Baby!
| | Subject: Re: VW Syncro Westfalia - Build Log with Pics 9/1/2012, 8:45 pm | |
| - Shane wrote:
- NICE WORK! I showed a couple guys your build at work....we are watching. ....
Question, why did your friend remove the H6. Those were and still are good motors. Gas milage kinda suffers but lots more power. Just woundeeing. Thanks. There are a couple reasons to run the 2.5L over the H6. While the H6 does have a lot more HP it is also hard on the drive train, a Syncro trans runs around $3500 to rebuild  . The H6 power band is also ill matched to the stock Vanagon gearing and the fuel mileage suffers because of it. Mike and I took his H6 to Portland and Back and averaged 13.5 MPG, the 2.5L is better matched to the stock gearing and will get you around 20 MPG. Overall the 2.5L offers the best bang for the buck Hodakaguy | |
|
| | |
Shane
Posts : 843
Join date : 2009-08-04
Age : 48
Bike : 09' DR650SE
| | Subject: Re: VW Syncro Westfalia - Build Log with Pics 9/1/2012, 9:08 pm | |
| Very interesting .. I have lots of questions but will wait and see  what you do. I am sure they will get answered .. | |
|
| | |
Sponsored content
| | Subject: Re: VW Syncro Westfalia - Build Log with Pics | |
| |
|
| | |
| | VW Syncro Westfalia - Build Log with Pics | |
|